工欲善其事,必先利其器
Hexo 框架本身提供了强大的扩展功能,可以和现有资源、工作流进行方便的整合。
本站没有采用使用Hexo系统时常见的GitHub/GitLab Pages托管页面的做法,而是独立运行在Vultr提供的Cloud Instance上,使用Cloudflare的CDN服务。在服务器上仅部署了Hexo生成的静态页面,源代码托管于GitLab,通过本地的Markdown编辑器或在线的StackEdit完成写作,最终使用Hexo Admin进行部署。
服务器准备
为了服务器迁移、多站点管理、自动化Let’s Encrypt证书的方便,选择使用Docker部署整个站点。
必要软件的安装
安装Docker 与Docker compose 。
配置nginx
使用nginx-proxy 作为统一的入口代理,将主机的80、443端口映射至此容器;使用acme-companion 用于管理和配置Let’s Encrypt证书。为了让二者协同工作,需要共享主机上一些特定的目录。
1
2
3
4
5
6
7
8
9
10
11
12
13
14
15
16
17
18
19
20
21
22
23
24
25
26
27
28
29
30
31
version: "3" services: nginx: image: jwilder/nginx-proxy container_name: nginx ports: - "80:80" - "443:443" restart: always labels: - "com.github.jrcs.letsencrypt_nginx_proxy_companion.nginx_proxy" volumes: - ./nginx/html:/usr/share/nginx/html - ./nginx/certs:/etc/nginx/certs:ro - ./nginx/conf:/etc/nginx/vhost.d - /var/run/docker.sock:/tmp/docker.sock:ro letsencrypt: image: jrcs/letsencrypt-nginx-proxy-companion container_name: letsencrypt volumes: - ./nginx/html:/usr/share/nginx/html - ./nginx/conf:/etc/nginx/vhost.d - ./nginx/certs:/etc/nginx/certs - ./letsencrypt/acme.sh:/etc/acme.sh - /var/run/docker.sock:/var/run/docker.sock:ro environment: - [email protected] depends_on: - nginx
配置静态站点
使用官方提供的nginx 镜像和默认配置部署静态站点,另外由于本站在主域名(hby.cx )上使用了CNAME到二级域名(blog.hby.cx ),所以这里配置了两段基本相同的service,一般情况下使用一段即可。环境变量NGINX_HOST NGINX_PORT VIRTUAL_HOST LETSENCRYPT_HOST的作用分别为:
变量
作用
NGINX_HOST
该容器中的nginx服务的默认server name
NGINX_PORT
该server监听的端口
VIRTUAL_HOST
nginx_proxy需要知道该站点的域名
LETSENCRYPT_HOST
letsencrypt-nginx-proxy-companion需要知道该站点申请的证书的域名
1 2 3 4 5 6 7 8 9 10 11 12 blog: image: nginx container_name: blog volumes: - ./blog/html:/usr/share/nginx/html:ro environment: - NGINX_HOST=blog.hby.cx,hby.cx - NGINX_PORT=80 - VIRTUAL_HOST=blog.hby.cx,hby.cx - LETSENCRYPT_HOST=blog.hby.cx,hby.cx restart: always
测试
为了测试站点是否正常,可在 ./blog/html中建立一个测试文件,即:
1
2
mkdir -p blog/html echo "Hello World" > ./blog/html/index.html
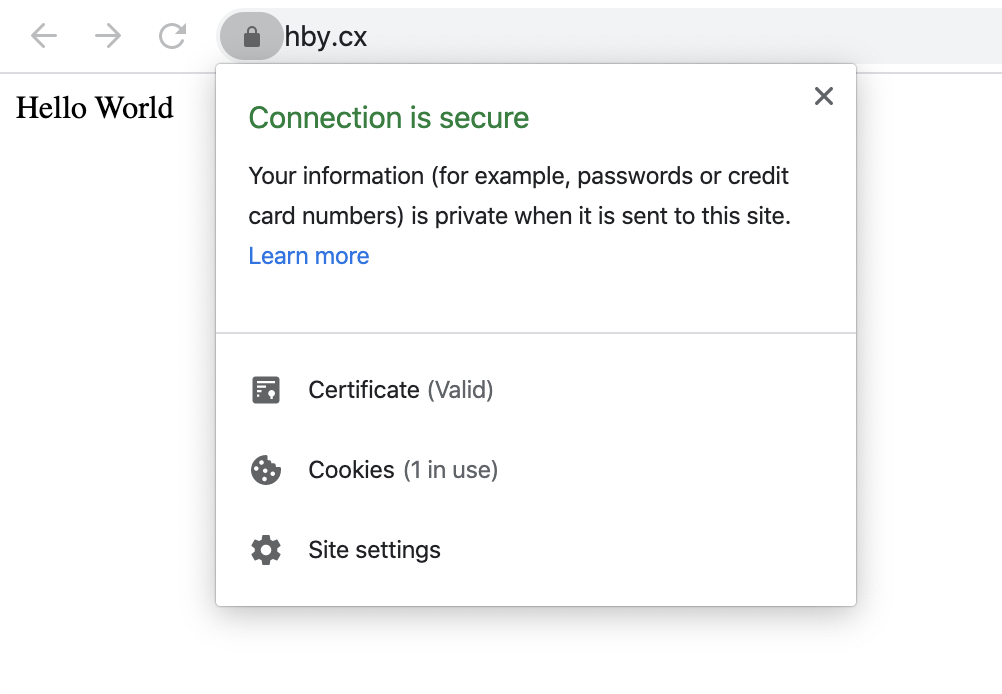
使用docker-compose up -d命令启动创建的容器,使用docker logs --follow letsencrypt跟踪letsencrypt容器的输出,待获得所有站点的证书后,在浏览器中打开http协议的该地址,若能自动跳转到https,同时输出 Hello World ,即表示服务器上部署成功。
CDN
关于Cloudflare的特殊说明ERR_TOO_MANY_REDIRECTS错误,因此,需要在Cloudflare的SSL/TLS中设置回源策略为Full或Full(strict),避免回源至HTTP。
本地准备
安装Hexo和插件
安装Hexo
为了尽量不向PATH中引入更多的命令,我采用了一些不同的安装方法
1
2
3
4
mkdir temp # 首先创建一个临时目录,在Hexo完成初始化后删除 cd temp && npm i hexo-cli # 在临时目录中安装一次 hexo-cli npx hexo init blog && cd blog # 使用hexo-cli初始化blog目录 cd ../.. && mv temp/blog . && rm -rf temp # 将初始化的blog目录放到temp同级目录下并删除temp
安装 管理工具Hexo Admin 和 喜欢的主题
配置Hexo Admin
由于未在PATH中引入hexo-cli,Hexo Admin在部署时会遇到Error: Config value "admin.deployCommand" not found的错误。根据 https://github.com/jaredly/hexo-admin/issues/70#issuecomment-220728060 ,修改Hexo Admin部署时的命令,首先,在_config.yml中加入:
1
2
admin: deployCommand: './hexo-admin-deploy.sh'
这样在Hexo Admin中点击部署时,将运行hexo-deploy.sh脚本,创建该脚本:
1 touch hexo-admin-deploy.sh && chmod a+x hexo-admin-deploy.sh
Hexo 可以很容易地将生成的静态页面
1
2
3
4
5
6
7
8
9
10
11
12
13
14
# !/usr/bin/env sh commitmsg="" if [ -z "$1" ]; then # Hexo Admin的Deploy功能会传递一个参数,若参数为空,则自动填写 commitmsg="Commit at $(date) without any info" else commitmsg=$1 fi git pull origin # 拉取远端代码 git add . # 加入新的修改 git commit -a -m "${commitmsg}" # 新建 commit git push origin # 推送至远端 npx hexo g -d # hexo不是全局命令,需要通过 npx 调用
(可选)配置本地写作环境
为了在本地预览和写作,需要用到Hexo的服务器功能 hexo s,又为了方便管理和访问,写一个简单的docker-compose.yaml和Dockerfile放在项目根目录中。
1
2
3
4
5
6
7
8
9
10
11
12
13
14
version: "3" services: blog: build: . container_name: blog volumes: - ./:/blog - ~/.ssh/id_rsa:/root/.ssh/id_rsa - ~/.ssh/known_hosts:/root/.ssh/known_hosts ports: - '4000:4000' restart: always entrypoint: ["npx" ,"hexo" ,"s" ]
1
2
3
4
5
6
7
8
FROM node:lts RUN apt-get update && \ apt-get install -y rsync git ssh && \ git config --global user.email "[email protected] " && \ git config --global user.name "user" ENV TZ=Asia/Shanghai WORKDIR /blog EXPOSE 4000
源代码托管与同步
通过上面的配置,本地项目便可以使用 VS code 和 Hexo Admin 访问,再将代码上传至 GitHub/GitLab 即可方便的托管。然而,由于我在 macOS 上没有找到一个舒服的 Markdown 编辑器,所以希望使用 StackEdit 进行写作。好在 StackEdit 与 GitLab 的集成非常简单,只需一个 Oauth2 授权即可完成。
构建GitLab CI
使用StackEdit或VS Code编辑文章后,可以自动或手动同步至GitLab,但仍然需要本地生成和部署文章至服务器,这里可以改进为使用GitLab CI,将生成和部署的工作由CI完成。
在服务器上部署 runner或使用公有runner。gitlab-runner 并初始化 。docker作为executor。
1 docker run --name runner --rm -v /root/runner-config:/etc/gitlab-runner gitlab/gitlab-runner register
初始化完成后,以run参数启动此runner:
1
2
3
4
5
6
7
8
9
10
11
version: "3" services: runner: image: gitlab/gitlab-runner:latest container_name: blog-runner volumes: - ./runner-config:/etc/gitlab-runner - /var/run/docker.sock:/var/run/docker.sock restart: always entrypoint: ["/entrypoint" , "run" , "--user" , "root" ]
通过上述两步,即创建了一个私有runner,用于执行构建任务。在项目根目前下新增一个CI构建文档.gitlab-ci.yml
1
2
3
4
5
6
7
8
9
10
11
12
13
14
15
16
17
18
19
20
21
22
23
24
25
26
27
28
default: image: node:lts stages: - prepare - deploy cache: paths: - node_modules/ install-dependency-job: stage: prepare script: - npm i deploy-job: stage: deploy script: - 'which ssh-agent || ( apt-get update -y && apt-get install openssh-client -y )' - apt-get update -y && apt-get install -y rsync - eval $(ssh-agent -s) - echo "$SSH_PRIVATE_KEY" | tr -d '\r' | ssh-add - - mkdir -p ~/.ssh - chmod 700 ~/.ssh - echo "$SSH_KNOWN_HOSTS" > ~/.ssh/known_hosts - chmod 644 ~/.ssh/known_hosts - npx hexo g -d
由于使用CI进行部署,Hexo Admin使用的脚本hexo-deploy.sh中,最后一行npx hexo g -d便可删除了。
博客系统的构建过程大约就是这些了。